Tips for an Inviting Entryway//

Entry ways are the first thing people experience when entering your home, whether that be a house or apartment, you want to make it feel inviting with their first step.

Now with homes, you more than likely will have more to work with, but apartment entry ways can be crowded and tricky. Overall, the goal is to make it feel clean and open for everyone. 

Here are my ideas: 

  1. Keep it clean

Obviously you’re living in the house day in and day out, so we have a tendency to just throw our shoes off so we can get relaxed, but for the days you know you’ll have visitors make sure you have storage and organization to make your entry space not over crowded with shoes and junk from the every day. They don’t want to be stepping over your mess as they say hello! 


2. Make it Inviting

People don’t want to walk into your home’s entryway with a view of cold walls and dullness. You want the entry way to feel warm, like it’s almost saying hello for you(I know cheesy). It’s the first statement of your home though! Make it say hello, literally with these cute signs!


3. Add your personality and style

Your entryway is the first piece of you people get to experience when they come into your home. If you have a specific style you’re going for, start it there. You can easily make something functional and trendy all at the same time. Don’t be afraid to be creative and embrace you. Here are my favorites to replicate currently….


I’d love to see some of your entryways- email me for ideas if you’d like!

XOXO


The Perfect Bar Cart//

I feel like there’s nothing more classy than a well styled bar cart. Bar carts are coming back in high demand in the interior world right now, so there’s never a better time to experiment!

The great thing is, they’re so EASY to DIY. Even if you don’t drink you can still style a bangin’ bar cart to add some class and style. If you’re looking for a statement piece for your room re-do then this is perfect for you! 

First, I wanted to list out the top bar carts to buy- some can transform as a DIY and some are already bar cart made and ready to style:

  1. Ikea Utility Cart, $29.99
  2. Target, Metal and Wood Bar Cart, $129.99
  3. Threshold Rattan Bar Cart, $129.99
  4. World Market, Utility/Wood Bar Cart, $169.99
  5. Ikea 3-Tier Cart, $24.99
  6. Ikea Laptop Table/Desk, $39.99

I wanted to give everyone different options of Inexpensive DIY carts, to fully ready- now let’s style them! 

  1. Make sure you have your cart fully stocked! 
  2. Find cute vases and or trinkets to style the cart
  3. Use your best glasses and mugs
  4. Style the tray tops to add more color and pop
  5. Find a great accent tray


Here are some examples of my favorite bar carts I’ve found. I’ll be going for a gold/white look once Chris and I are all moved into our new place. Personally, I’m DIY-ing this thing as we will be trying to fully finish an entire apartment and a styled bar cart is out of my price range. ENJOY!


Gold and White Styling


Accessories


Industrial/Rustic Styles


Ikea Hacks

ikea hackk


Don’t forget- it doesn’t have to be alcohol related. You can easily convert these into coffee bars, storage carts, diaper carts, or open shelving. The options are endless! 


XOXO


Dollar Vases and Glitter//

It’s been weeks of DIY for the wedding and I’ve been so thankful to the many people that have helped me get almost all my projects checked off the list!

Last night, Momma Smith and I worked on the few remaining vases and I decided to experiment a bit. I know, I know with wedding decor?! But these were dollar vases so if I messed up we weren’t out too much.

In earlier projects I’d carefully taped off vases along side my helpers and they did turn out great, but I wanted a different effect this time and  I think all the different looks will look great together!


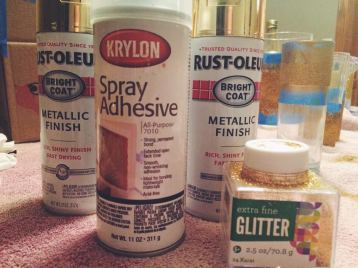
Here are the essentials you’ll need for these vases:

  1. Clear vases from Dollar Tree (literally one dollar)
  2. Spray Adhesive
  3. Metallic Gold spray paint
  4. Extra fine gold glitter
  5. Latex gloves to protect your hands

Processed with VSCOcam with f2 preset

Now we did all spray painting in the house so the paint sets right with the cold- if you do this, try to tape up a box so you can set it inside to spray. We don’t need paint everywhere, right?! 

wedding projects

Gold Spray Paint

With the gold spray paint all we did was simply spray the bottom and let it die off as you neared the top of the vase. Spray it gradually and slowly so you don’t spray too much and it drips, and it also allows you to have that subtle end of the paint into the glass.

Spray Adhesive and Glitter

I did the same thing with the spray adhesive, just spray it gradually where on the vase you’d like the glitter to be, stagger the sprays so you have some different edging, and then sprinkle the glitter onto the adhesive, let dry.


Here are the final products: 

Processed with VSCOcam with f2 preset


Don’t they look great?! How awesome will a flickering candle look with the fade of the paint?

I’m so excited about how these turned out, and even more excited about how easy and inexpensive the project is.


Hope you enjoy!

xoxo


Drab to Fab//

Since it’s cold, gloomy, and let’s be honest somewhat depressing around the country, I wanted to add a colorful spark to everyone’s day.

Here is my how to on spicing up your living spaces with the lousy weather outside your window….


  1. Accent Pillows

It’s so easy to just keep the same pillows because we get used their comfort, but let’s be honest, they probably look pretty ratty. Spruce up your living room with some bright pillow accents that will bring color back into your life and texture to your decor!


Target, Threshold Fur Pillows


Pom Pom

Anthropologie Pom Pillow


2. Rugs

Adding a new rug can really spruce up a room. Most rugs get worn so quickly, so think about investing in something a bit more pricey that’ll last through the traffic. Here are some beautiful rugs that would add so much to any space depending on your style.

Anthropologie Kaleidoscopic Bloom Rug

Wayfair, Sherpa Ivory Rug


3. Paint your Utensils

An easy, fun DIY project to add color to your kitchen is to paint your wooden spoons and utensils! Just tape them off, paint them, let dry and you’ve got some much needed extra color while you’re cooking!


4. New Curtains

Curtains can add so much to a room! You can pick a beautiful sheer for the sun to peek in through or a bright accent shade to really add to your decor! The choice is yours, but here are some of my current favorites!

Anthropologie Pleated, Mint Curtain

Nate Berkus, Fringed Herringbone Curtains


5. Fresh Flowers

This is the simplest option because you can go get fresh flowers even at your local grocery store! Fresh flowers don’t only add color, but they bring literal life into your home during the winter.

Here are the winter flowers currently in season:

1. Dahlias

2. Snap Dragons

3. Roses

4. Tulips

5. Ranunculus

6. Gerber Daisies


Have a great weekend loves!

xoxo


Glitter and DIY Weekends//

Happy New Year! 2016 is going to be such a wonderful year full of new marriages, travel, and new adventures! I can’t wait!

The season of do it yourself projects is upon me! This past weekend I had the house all to myself and took full advantage by taking over the house with all my projects! Today I’ll post my simple wedding DIY’s, but I have more to show you this week too!

I can also successfully say I used two bottles of glitter and got none in the house! I know, impressive! As people say, glitter is the herpes of the craft world! (haha!)

I went ahead and took care of my table number holders, glittered up feathers, and added some sparkle to our wedding parties toast glasses!

What You Need: 

Gold Paint- 2 bottles ($3.00 at Hobby Lobby)

Mint Paint(color: sweet mint)- 1 bottle ($3 at Hobby Lobby)

Small Paint Brushes- $1 at dollar tree

Gold Glitter- 2 Bottles ($2.99 at Hobby Lobby)

Spray Adhesive- 1 Can ($4 at Walmart)

Wooden Clips- 1 spool ($1 target bargain bins)

White Feathers- 1 package has 5-6 feathers ($3 at Hobby Lobby)

Wine/Champagne Glasses- $1 at Dollar tree


Let’s start with the feathers…

  1. Dump some gold paint onto a small plate and glitter on another
  2. Cover the tip of the feather so no white is showing, using the paint brush
  3. Dip the painted end in the glitter till it’s completely covered
  4. Lay out to dry
  5. Spray with Adhesive spray

Easy, peasy! And so cute! These will be used all over my wedding decor, and then all over our place! 


Table Numbers DIY

  1. Pour some sweet mint paint onto a plate and glitter on another
  2. Paint each wooden clip and let set to dry
  3. Spray ends with spray adhesive
  4. Dip glue ends in glitter till completely covered
  5. Spray again with adhesive to set the glitter
  6. Let dry

These will hold table numbers that are gold and cream! They’re so simple, they’ll add just the perfect amount of color and glam to the table. 


Last, the champagne! 

champange glasses

  1. Lay a towel down you can throw out
  2. Spray adhesive on the bottom portion of the glass
  3. Take a full glitter bottle, and dump glitter all over the glue area
  4. Spray adhesive to seal the glitter
  5. Let dry!

These glasses were $1 at dollar tree for their holiday collection! Such a score! The glitter adds a nice touch, and they’re water proof with the adhesive! Such a great addition to the wedding table, and our wedding party can take them home! 


Enjoy! Xoxo