Smith Fall Decorations//

Happy Fall Y’all!

I’m sure some of you are haters on those of us that believe fall should start the beginning of September, but I don’t care, I love the changing season!

As you’ve heard, I’m offering help with Holiday decorating this year starting with any and all fall and Thanksgiving decorating you’d like, and ending with the big kahuna, Christmas!  I know that fall decorating can be obviously lighter than anything done for Christmas, but if you’re wanting to try out a new color scheme or style, that’s where I can help!

My mom, being the best mom she is, let me decorate her front porch area WAY earlier than she likes to just to show some simple decorations that make your front door look so inviting and festive for the season. We bought a few things and used some existing. I think total she spent around $50 on anything new, which was exactly what she asked for with budget.

Let’s check it out…

Processed with VSCO with f2 preset

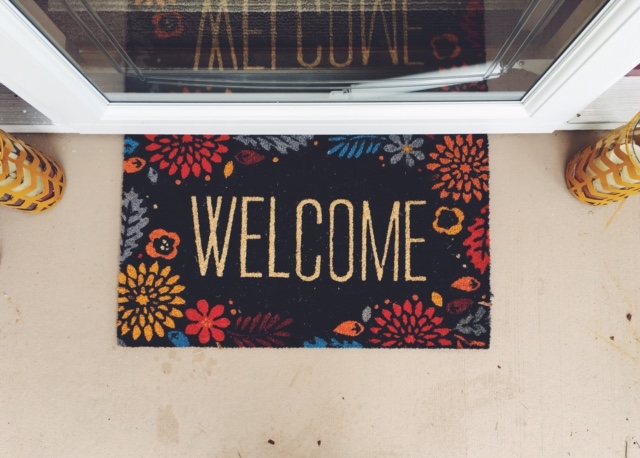
How perfect do these mustard yellow lanterns my mom had match this rug? It’s so easy to save money on holiday decorating when incorporating color’s and items you already have.

Processed with VSCO with f2 preset

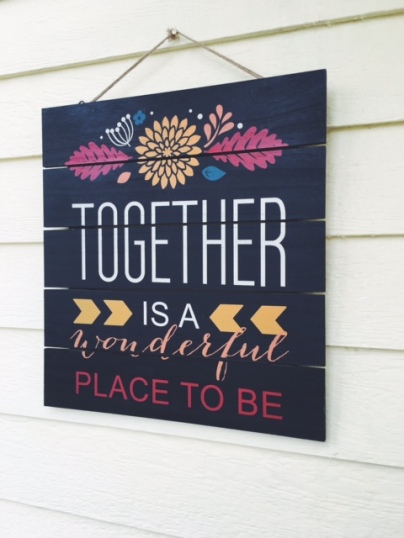
We found this sign first before the mat. Both are from Hobby Lobby, and all their holiday decor is 40% off right now, and I would say through the Holiday season. I love that place and their deals! I love the fall colors, but it’s a little more contemporary, rather than country rustic.

When decorating for fall OF course you need pumpkins and mums. They’re the perfect outdoor fall items to use for decorating! The lantern, fall sign and white pumpkin were all finds at Michael’s for 60% off. I know the sales are awesome! The small table that mum is sitting on, my mom already had, which went PERFECTLY with the sign and mat we found with color and style.

Processed with VSCO with f2 preset

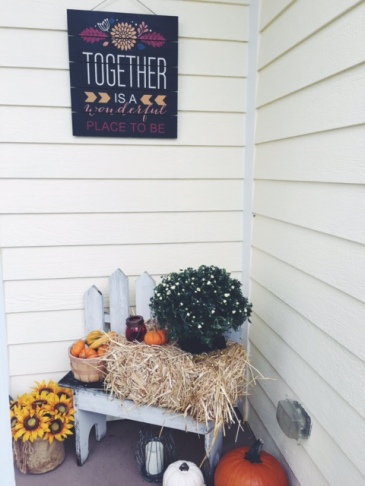
This is the other side of her porch, it’s a little nook of an area, and she uses this cute white bench EVERY season and just changes what is put on it and style. The style and chipped paint look is perfect to a little rustic fall in the decor.

The lantern and burlap basket of sunflowers was from last fall, but fit in nicely with everything. The only new items in this entire area are the white mum, lanterns, and pumpkins. It’s so easy to pick up some new and mix in with the old!


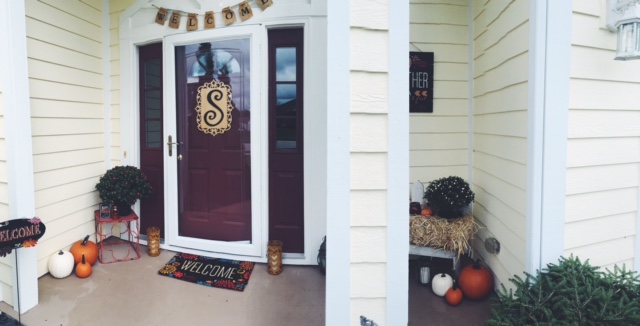
Overall, we both loved the new items and how everything ended up blending so well together. You’ll notice in some shots of the entire front door, there’s a burlap “Welcome” banner above the door. Another item she already had that fit in perfect!

Processed with VSCO with f2 preset


I know fall can be easy for some, but anyone is interested in my help, you’ll find my email in the contact section. If you’d like to talk CHRISTMAS then PLEASE message me! I love decorating for Christmas, and it’s a bigger project so we’d want to get started sooner!


Happy Monday everyone!

XOXO

Tuesday Sneak Peak//The Living Room

Hey y’all! So this week I will be posting snip its of our living room. It came together exactly how I wanted, and it’s such a cozy place for us to put our feet up after a long day.

I’ve posted the photos on social media, but let me tell you my brain process on here.


IMG_1626.jpg

This gallery look is on our main wall. It centers on the wall with some shelves to the left in the corner and then our TV unit to the right. I love the blend of items on our wall as the focal point. The photos are a mix of wedding and honeymoon, our favorite things to look back on right now. 

The sunburst mirror was a random sale purchase on day at Hobby Lobby. It’s such a great statement mirror and went along with the natural and gold color scheme I have with the navy and mauve.

The “M” I also found at Hobby Lobby on sale! $7 bucks people! I bought that 5 months before we even got married, never skip a great deal if know you’ll end up using it!

The arrow, Hobby Lobby, full price, but still only $15 bucks or so and the stag/deer head was a Christmas gift(that I picked out!) That stag head I love because it brings in a nature feel. I grew up in a house with hunters, so it feels like home to me. Someday I’m hoping I get a real one! 

Last, those decals! I found them on etsy! They’re completely removable and so easy to stick up. It took me 30 minutes one night to do the entire wall! 


Stay tuned for the rest of the room throughout the week! 

XOXO

Wedding Design//

I hope everyone is enjoying their memorial day weekend! I spent my afternoon boating with the parents and trying to soak in as much rays as possible. Our family lives for summer sunshine and long days on the water!

This week has been an absolute blast as we re-live our wedding through all our pictures. Our very talented photographer, Arielle Peters, also happens to be my very sweet cousin-in-law and we were incredibly blessed to have such talent for our special day! Seriously, if you want her info let me know, she’s the best, in my very biased opinion!

One thing I’ve been wanting to do since the planning of our wedding is see how all my decor ideas and visions finally came together for the big day, and honestly it was EXACTLY how I saw it in my head! It’s always great when that happens isn’t it? Today I wanted to show off the elements I used!

Side Note: If anyone is interested in hiring me to help with a wedding coming up- Contact me! I would love to build my portfolio and help anyone that finds designing the challenging part. 

So here’s the 411 on all the wedding decor:

Colors: Shades of mint, gold, white, purple, hot pink

Theme: Bohemian, eclectic glam

Flowers: White Ranaculas, hot pink carnations, purple misty, babys breath, potted succulents, and fresh lilac

When I first started planning out our wedding decor I knew I wanted gold and bright colors. It was going to be spring so I knew I wanted to nice soft spring color for the girls dresses, and aqua/mint just happens to be my favorite color, so that was an easy pick! Then I simply picked complementary colors to match those two.

One of my suggestions would be not to solidify your complementary colors until you go look at flowers. I wasn’t planning on having any purple flowers in our wedding and then fell in love with these beautiful wildflowers that were all purple, so that got added! And by the way it adds to the bouquets and table arrangements I say it was the best decision I made for the decor. So don’t get hung up on the dreams in your head, because something better could come along!

Alright now the details…

  1. The Guest Tables

I knew I wanted a long farmhouse table look, with the vases scattered through out the middle lining the entire length. Once I picked white tablecloths, using the gold accent of a table runner was a no brainer to add color, but not too much. It was the perfect subtle accent.

Most of the vases I used were bought at Hobby Lobby on half off weeks, or dollar tree and spray painted. The pots for the tiny succulents were a Hobby Lobby purchase and we simply painted them gold with brushes. Spray paint was bought in bulk for these projects, but it was worth it! Lastly, the dinos! My favorite part and all because of my cute, nerdy husbands love for them. I found bags of 250 dino’s through a teacher magazine of my moms, we ordered two bags and simply spray painted them gold!

For the place settings, I was able to borrow china from a family friend’s past wedding. They had all different versions of white plain dishes and silverware so each person had a different style, but I was still able to keep the simplicity of the white. Their name tag and wedding favor dinosaur sat on top as they arrived to their seat.


2. The Guestbook and Gifts Table

This table was really fun, because I had over time collected different wall art about starting our story together to add with our engagement pictures. I used vases that were also used on the guest tables, and also added some unique elements. Our guest book was a globe I found at Hobby Lobby. Chris and I love to travel, and we though it was the perfect piece we could use in our homes for, forever. Our cards were placed in between the spokes of a gold birdcage I also found at Hobby Lobby. My favorite part was the sparkling sequin table runner that added so much glam and color to the white linens.


Details-32Details-37Details-35


Details-90Details-92


3. The Cake Table

The cake table is near and dear to my heart. I found the cabinet at a little shop in Broad Ripple, Indianapolis with one of my bridesmaids. It was already painted mint, and heavy as sin, and I LOVED it! As planning went on, I knew we’d use it in our home and the mint didn’t match so I decided to bring in the navy since the guys would be wearing navy to accent the girl’s mint dresses. Then I got creative and added T-Rex heads as the door knobs. I threw on another sparkly table runner, and a cute little sparkle banner and it was perfect for our delicious naked cake!

Details-40Details-78


4. The Ceremony Stage

At this point on Saturday afternoon my brain was fried from putting everything together. My girls helped me a lot when putting the stage together for the ceremony the next day. The special part of it is, a lot of it was family heirlooms. The chest, the little chair, and stool were all passed down on one side of my family. We added some sweet little doily’s and more of the glam gold and flowers and it was the PERFECT mix of what I was going for.

Details-23Details-24Ceremony-19


I hope you enjoyed relishing in the beauty that is a wedding. If I could just decorate weddings and homes all the time I think I’d be in heaven!

Anyone who would like help decorating their wedding, find my contact information on the contact page! I’d love to work with you!

XOXO

Gallery Walls//

Gallery Walls are near and dear to my heart. I love how creative people can get with them, and it’s completely true that the possibilities are endless.

Our apartment is the typical beige on beige with white walls, so our gallery wall really adds to the living room decor.

The pieces are a bit more neutral as our living room is a eclectic, boho style with more neutral pieces and pops of color in rugs and pillows. I tried to choose neutral, but eye catching pieces for the wall to keep that range.

Here it is all together:

Processed with VSCOcam with hb1 preset


I’m sure you’re wondering where the pieces came from, here’s the breakdown…

Hobby Lobby:

Arrow Painting

Steer Skull

Feathers

Wooden Arrow

“M” Initial

Target:

White Stag Head

The LOVE letters were from my Bridal Shower, wooden and simple painted gold

The wooden board with one of my favorite sayings was a gift from a dear friend

Processed with VSCOcam with m5 preset


Here are some of my tips to create a great gallery wall:

  1. Lay it Out

We’ve all been there when you just start putting things up and you step back and it looks like your 5 year old kid just told you where to put it all. Lay out all your pieces exactly how you’ll want them on the wall.

2. Tape it out

Next, take the time to measure things out on the floor and use painters tape to tape where each thing goes on the wall. I promise you won’t regret taking the time to do this

3. Choose Your Accents

You can see that the stag head and steer skull stick out there in the middle, that’s because they’re my favorite of all the pieces. I wanted to center everything around those two and work out from there. Since they’re smaller I put the larger pieces in the corners to pull the eye outwards then

Processed with VSCOcam with p5 preset

Shelf Styling//

It’s been TOO LONG since I blogged! I sincerely had no time amongst the moving and starting a new job, but BONUS, now I have my own designs to show you as well!

Since I’m still piecing rooms together I don’t want to do a full room yet, so I’ve decided to do my favorite, for the most part, finished pieces among our apartment for now.

Today: How to style a shelving unit

Processed with VSCOcam with f2 preset


Here are a few tips and tricks I try to stick to:

  1. Stay Simple

As you can see, I’m not overwhelming my shelves. I use enough pieces to consider it useful, but not enough that it seems like I didn’t have anywhere else to put things. Over clutter is the death of a good shelving unit. 

2. Use Different Shapes and Levels

Visually, if everything is the same level, or same shape, it’d be a rather boring unit. Notice the way I’ve set things up. I have books and records on multiple shelves, but I’ve placed them horizontally, vertically, in the middle of the shelf, or to the side. I’ve also added different items to accentuate height or fill a tiny open space from vases, to candles, to the picture frame.

Processed with VSCOcam with f2 preset

     3. Personalize it

I love fresh flowers so I’ve added that in two different places. We also recieved this sweet engraved box from our photographer with our engagement pictures, I love that our initials are on it, and it sits perfectly on that shelf. I also LOVE candles. Ask my fiance, or really anyone that knows me, I don’t have a room without a candle.

Find the things you love and fill your home with it! Don’t be afraid to step outside the lines a little either. Our living room is very eclectic with boho accents and gallery walls. This industrial shelf ties it all together!


To all those in Indiana, stay warm and safe tonight!

Xoxo

Tips for an Inviting Entryway//

Entry ways are the first thing people experience when entering your home, whether that be a house or apartment, you want to make it feel inviting with their first step.

Now with homes, you more than likely will have more to work with, but apartment entry ways can be crowded and tricky. Overall, the goal is to make it feel clean and open for everyone. 

Here are my ideas: 

  1. Keep it clean

Obviously you’re living in the house day in and day out, so we have a tendency to just throw our shoes off so we can get relaxed, but for the days you know you’ll have visitors make sure you have storage and organization to make your entry space not over crowded with shoes and junk from the every day. They don’t want to be stepping over your mess as they say hello! 


2. Make it Inviting

People don’t want to walk into your home’s entryway with a view of cold walls and dullness. You want the entry way to feel warm, like it’s almost saying hello for you(I know cheesy). It’s the first statement of your home though! Make it say hello, literally with these cute signs!


3. Add your personality and style

Your entryway is the first piece of you people get to experience when they come into your home. If you have a specific style you’re going for, start it there. You can easily make something functional and trendy all at the same time. Don’t be afraid to be creative and embrace you. Here are my favorites to replicate currently….


I’d love to see some of your entryways- email me for ideas if you’d like!

XOXO


The Perfect Bar Cart//

I feel like there’s nothing more classy than a well styled bar cart. Bar carts are coming back in high demand in the interior world right now, so there’s never a better time to experiment!

The great thing is, they’re so EASY to DIY. Even if you don’t drink you can still style a bangin’ bar cart to add some class and style. If you’re looking for a statement piece for your room re-do then this is perfect for you! 

First, I wanted to list out the top bar carts to buy- some can transform as a DIY and some are already bar cart made and ready to style:

  1. Ikea Utility Cart, $29.99
  2. Target, Metal and Wood Bar Cart, $129.99
  3. Threshold Rattan Bar Cart, $129.99
  4. World Market, Utility/Wood Bar Cart, $169.99
  5. Ikea 3-Tier Cart, $24.99
  6. Ikea Laptop Table/Desk, $39.99

I wanted to give everyone different options of Inexpensive DIY carts, to fully ready- now let’s style them! 

  1. Make sure you have your cart fully stocked! 
  2. Find cute vases and or trinkets to style the cart
  3. Use your best glasses and mugs
  4. Style the tray tops to add more color and pop
  5. Find a great accent tray


Here are some examples of my favorite bar carts I’ve found. I’ll be going for a gold/white look once Chris and I are all moved into our new place. Personally, I’m DIY-ing this thing as we will be trying to fully finish an entire apartment and a styled bar cart is out of my price range. ENJOY!


Gold and White Styling


Accessories


Industrial/Rustic Styles


Ikea Hacks

ikea hackk


Don’t forget- it doesn’t have to be alcohol related. You can easily convert these into coffee bars, storage carts, diaper carts, or open shelving. The options are endless! 


XOXO


Dollar Vases and Glitter//

It’s been weeks of DIY for the wedding and I’ve been so thankful to the many people that have helped me get almost all my projects checked off the list!

Last night, Momma Smith and I worked on the few remaining vases and I decided to experiment a bit. I know, I know with wedding decor?! But these were dollar vases so if I messed up we weren’t out too much.

In earlier projects I’d carefully taped off vases along side my helpers and they did turn out great, but I wanted a different effect this time and  I think all the different looks will look great together!


Here are the essentials you’ll need for these vases:

  1. Clear vases from Dollar Tree (literally one dollar)
  2. Spray Adhesive
  3. Metallic Gold spray paint
  4. Extra fine gold glitter
  5. Latex gloves to protect your hands

Processed with VSCOcam with f2 preset

Now we did all spray painting in the house so the paint sets right with the cold- if you do this, try to tape up a box so you can set it inside to spray. We don’t need paint everywhere, right?! 

wedding projects

Gold Spray Paint

With the gold spray paint all we did was simply spray the bottom and let it die off as you neared the top of the vase. Spray it gradually and slowly so you don’t spray too much and it drips, and it also allows you to have that subtle end of the paint into the glass.

Spray Adhesive and Glitter

I did the same thing with the spray adhesive, just spray it gradually where on the vase you’d like the glitter to be, stagger the sprays so you have some different edging, and then sprinkle the glitter onto the adhesive, let dry.


Here are the final products: 

Processed with VSCOcam with f2 preset


Don’t they look great?! How awesome will a flickering candle look with the fade of the paint?

I’m so excited about how these turned out, and even more excited about how easy and inexpensive the project is.


Hope you enjoy!

xoxo


Drab to Fab//

Since it’s cold, gloomy, and let’s be honest somewhat depressing around the country, I wanted to add a colorful spark to everyone’s day.

Here is my how to on spicing up your living spaces with the lousy weather outside your window….


  1. Accent Pillows

It’s so easy to just keep the same pillows because we get used their comfort, but let’s be honest, they probably look pretty ratty. Spruce up your living room with some bright pillow accents that will bring color back into your life and texture to your decor!


Target, Threshold Fur Pillows


Pom Pom

Anthropologie Pom Pillow


2. Rugs

Adding a new rug can really spruce up a room. Most rugs get worn so quickly, so think about investing in something a bit more pricey that’ll last through the traffic. Here are some beautiful rugs that would add so much to any space depending on your style.

Anthropologie Kaleidoscopic Bloom Rug

Wayfair, Sherpa Ivory Rug


3. Paint your Utensils

An easy, fun DIY project to add color to your kitchen is to paint your wooden spoons and utensils! Just tape them off, paint them, let dry and you’ve got some much needed extra color while you’re cooking!


4. New Curtains

Curtains can add so much to a room! You can pick a beautiful sheer for the sun to peek in through or a bright accent shade to really add to your decor! The choice is yours, but here are some of my current favorites!

Anthropologie Pleated, Mint Curtain

Nate Berkus, Fringed Herringbone Curtains


5. Fresh Flowers

This is the simplest option because you can go get fresh flowers even at your local grocery store! Fresh flowers don’t only add color, but they bring literal life into your home during the winter.

Here are the winter flowers currently in season:

1. Dahlias

2. Snap Dragons

3. Roses

4. Tulips

5. Ranunculus

6. Gerber Daisies


Have a great weekend loves!

xoxo


Glitter and DIY Weekends//

Happy New Year! 2016 is going to be such a wonderful year full of new marriages, travel, and new adventures! I can’t wait!

The season of do it yourself projects is upon me! This past weekend I had the house all to myself and took full advantage by taking over the house with all my projects! Today I’ll post my simple wedding DIY’s, but I have more to show you this week too!

I can also successfully say I used two bottles of glitter and got none in the house! I know, impressive! As people say, glitter is the herpes of the craft world! (haha!)

I went ahead and took care of my table number holders, glittered up feathers, and added some sparkle to our wedding parties toast glasses!

What You Need: 

Gold Paint- 2 bottles ($3.00 at Hobby Lobby)

Mint Paint(color: sweet mint)- 1 bottle ($3 at Hobby Lobby)

Small Paint Brushes- $1 at dollar tree

Gold Glitter- 2 Bottles ($2.99 at Hobby Lobby)

Spray Adhesive- 1 Can ($4 at Walmart)

Wooden Clips- 1 spool ($1 target bargain bins)

White Feathers- 1 package has 5-6 feathers ($3 at Hobby Lobby)

Wine/Champagne Glasses- $1 at Dollar tree


Let’s start with the feathers…

  1. Dump some gold paint onto a small plate and glitter on another
  2. Cover the tip of the feather so no white is showing, using the paint brush
  3. Dip the painted end in the glitter till it’s completely covered
  4. Lay out to dry
  5. Spray with Adhesive spray

Easy, peasy! And so cute! These will be used all over my wedding decor, and then all over our place! 


Table Numbers DIY

  1. Pour some sweet mint paint onto a plate and glitter on another
  2. Paint each wooden clip and let set to dry
  3. Spray ends with spray adhesive
  4. Dip glue ends in glitter till completely covered
  5. Spray again with adhesive to set the glitter
  6. Let dry

These will hold table numbers that are gold and cream! They’re so simple, they’ll add just the perfect amount of color and glam to the table. 


Last, the champagne! 

champange glasses

  1. Lay a towel down you can throw out
  2. Spray adhesive on the bottom portion of the glass
  3. Take a full glitter bottle, and dump glitter all over the glue area
  4. Spray adhesive to seal the glitter
  5. Let dry!

These glasses were $1 at dollar tree for their holiday collection! Such a score! The glitter adds a nice touch, and they’re water proof with the adhesive! Such a great addition to the wedding table, and our wedding party can take them home! 


Enjoy! Xoxo